
This post is part 2 of a 3-part series of posts on how to extend the Sitecore Commerce Business Tools. The other parts are:
The Commerce Business Tools: How does it work?
The Commerce Business Tools: Creating your own Angular components
How do I extend it?
In Commerce Business Tools: how does it work? you learned how the business tools work and which pipelines are involved to customize the tools.
The next question will be: how do you extend the business tools?
Well, that depends on what you want to do.
For most scenarios you don’t need to touch the BizFx SDK because you can do it by extending the engine.
About naming stuff
- Editable in the Commerce Control Panel
- Look in the
Commerce Engine Setting>Commerce Terms>Business Tools>View Names/View Action Names/View Property Names
How do I extend an existing view?
Now you know which pipelines are involved in the process and how entity views work, the next question is of course: how can I extend this?
We’ll start with the easiest way to extend the business tools and that is by adding an additional property to an existing view.
Let’s say we want the creation date and last update date of a sellable item to show in the Summary view.
At the moment this view, looks like this:
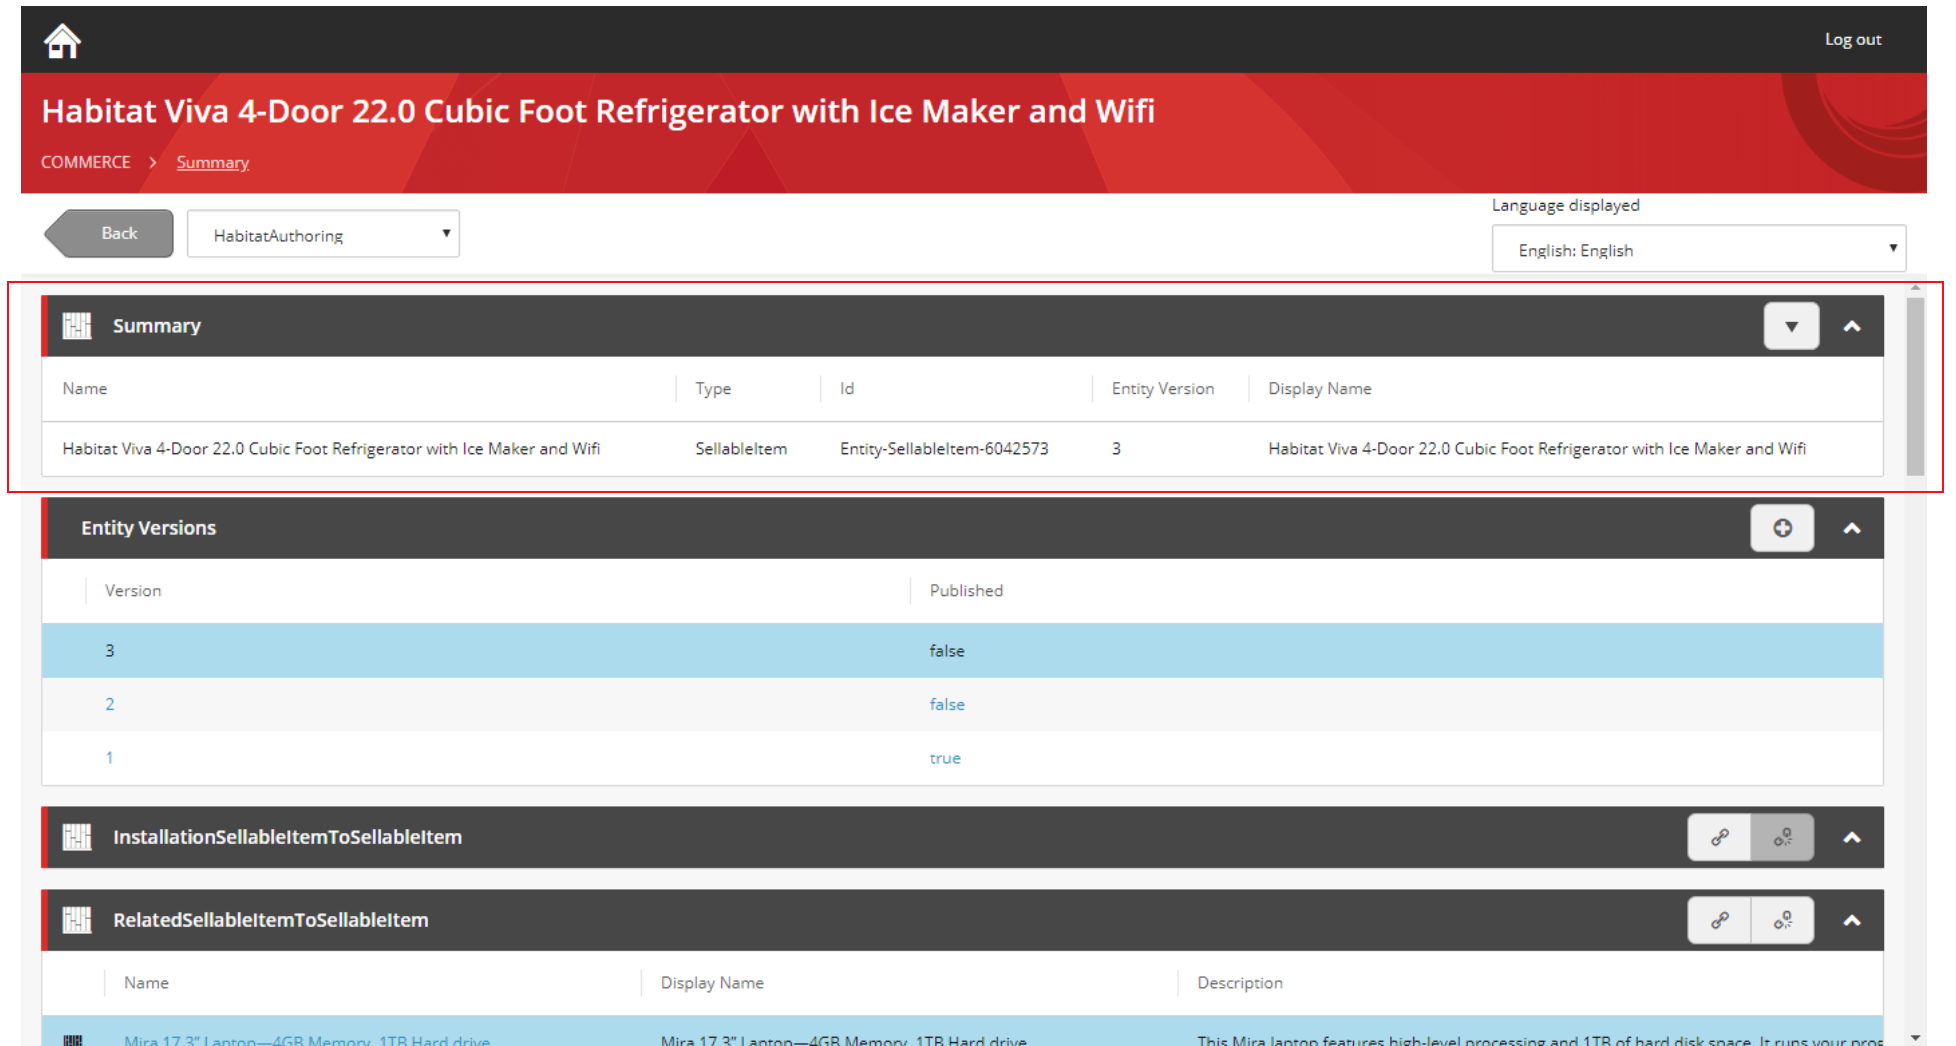
We want to add the date the sellable item was and last updated date to this view.
You might think that one way to do this is, is to create a subclass of the block that creates the view and extend this. That is certainly possible, but not the best way to do this.
Instead what we will do is create a new PipelineBlock called ExtendSellableItemDetailsViewBlock and add this to the IGetEntityViewPipeline.
public class ExtendSellableItemDetailsViewBlock : PipelineBlock<EntityView, EntityView, CommercePipelineExecutionContext>
Remember that the IGetEntityViewPipeline gets called for each view requested by the business tools, so it contains all the blocks responsible for creating all the views. Each block has to decide by itself whether it needs to add something to the requested view.
So the first thing the ExtendSellableItemDetailsViewBlock has to do is decide whether the requested view is the one it wants to add something to. It does this by checking whether the name of the requested view is Master:
Condition.Requires(entityView).IsNotNull($"{this.Name}: The argument can not be null");
var policy = context.GetPolicy<KnownCatalogViewsPolicy>();
EntityViewArgument request = context.CommerceContext.GetObject<EntityViewArgument>();

if (string.IsNullOrEmpty(request?.ViewName) || !request.ViewName.Equals(policy.Master, StringComparison.OrdinalIgnoreCase))
{
	return Task.FromResult(entityView);
}
and whether the requested entity is a sellable item:
if (!(request.Entity is SellableItem) || !string.IsNullOrEmpty(request.ForAction))
{
  return Task.FromResult(entityView);
}
If it is, it will add two properties to the view, one with the created date:
var dateCreatedProperty = new ViewProperty() {
    DisplayName = "Date Created",
    Name = nameof(sellableItem.DateCreated),
    IsReadOnly = true,
    RawValue = sellableItem.DateCreated
};
entityView.Properties.Add(dateCreatedProperty);
and one with the last update date of the sellable item.
var dateUpdatedProperty = new ViewProperty() {
  DisplayName = "Date Updated",
  Name = nameof(sellableItem.DateUpdated),
  IsReadOnly = true,
  RawValue = sellableItem.DateUpdated
};

entityView.Properties.Add(dateUpdatedProperty);

return Task.FromResult(entityView);
Now we only need to add the new block to the IGetEntityViewPipeline after the block that creates the original summary view (GetSellableItemDetailsViewBlock). The code looks like the code below and we add it to a ConfigureSitecore class:
services.Sitecore().Pipelines(config =>
   config.ConfigurePipeline<IGetEntityViewPipeline>(c =>
      c.Add<ExtendSellableItemDetailsViewBlock>().After<GetSellableItemDetailsViewBlock>()
   )
);
Something to note about the
GetEntityViewPipeline: At the end ofGetEntityViewPipelineit calls theIFormatEntityPipelinewhich will do some magic. If you add your block after this pipeline, you might not see anything if you only added stuff to theRawValueproperty because that pipeline makes sure theValueproperty is filled.
After we run the Commerce Engine, the end result looks like this:
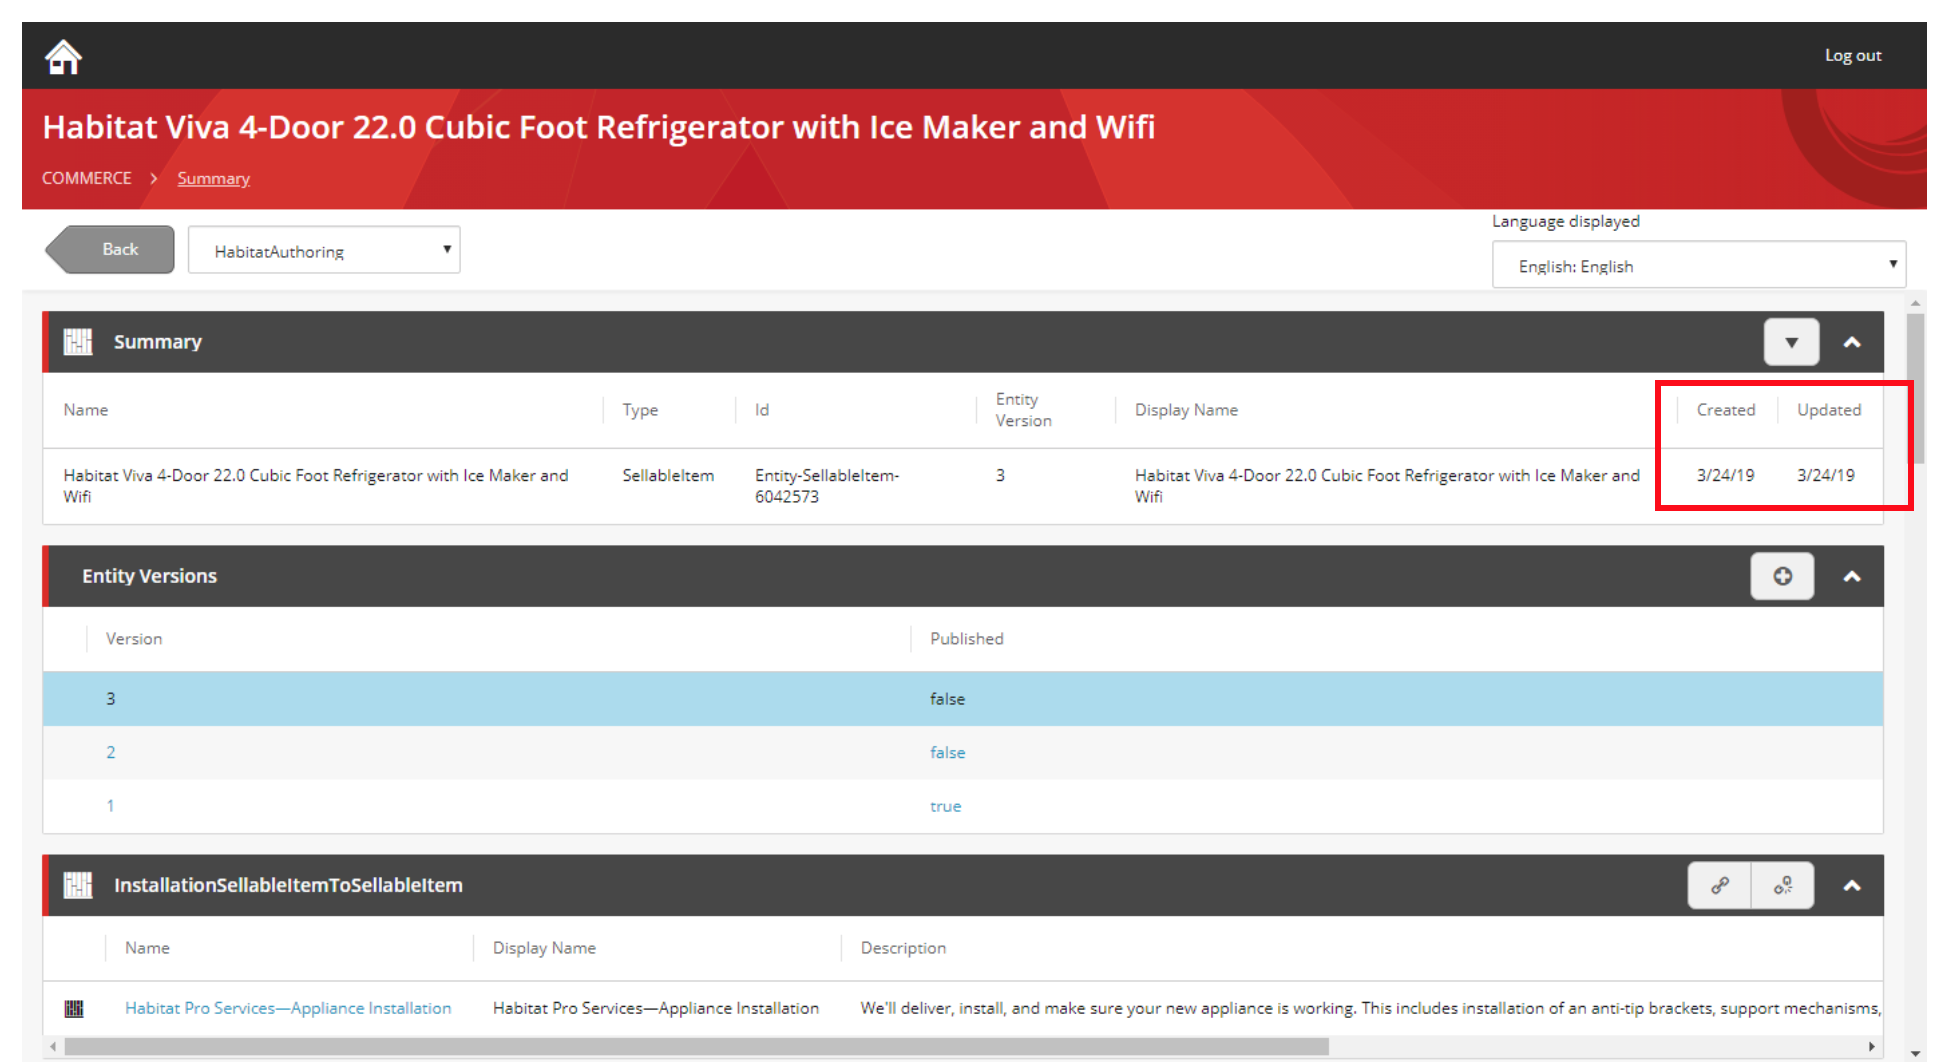
So now we have added two properties to an existing view.
Remember how you do this:
- Create a new pipeline block;
- Find the name of the view you want to extend;
- Add the properties you want to add to this view;
- Finally add the new block to the
IGetEntityViewPipeline, making sure you add the block after the block that creates the view you want to extend;
You will find the code for this block here.
How do I add a new (child) view?
Adding a child view builds on what we did for adding a property to an existing view.
Let’s say you want to display the data of a component you added. It’s a component that merchandisers can use to add notes and warranty information to a sellable item.
The code for the component is simple and looks like this:
namespace Plugin.Sample.Notes.Components
{
    using Sitecore.Commerce.Core;

    public class NotesComponent : Component
    {
        public string InternalNotes { get; set; } = string.Empty;
        public string WarrantyInformation { get; set; } = string.Empty;
    }
}
We want to display the data in this component on the entity view page for a sellable item.
Again, we create a new block, this time we call it GetNotesViewBlock.
[PipelineDisplayName(nameof(GetNotesViewBlock))]
public class GetNotesViewBlock : PipelineBlock<EntityView, EntityView, CommercePipelineExecutionContext>
{
    protected ViewCommander Commander { get; set; }

    public GetNotesViewBlock(ViewCommander commander)
        : base(null)
    {
        this.Commander = commander;
    }

    public override Task<EntityView> Run(EntityView entityView,
	CommercePipelineExecutionContext context)
    {
        Condition.Requires(entityView).IsNotNull($"{this.Name}: The argument can not be null");
	.
	.
	.
As with the previous block we created, first thing we need to do is check if the request we receive is for the entity view we want to extend. The standards views are called Master most of the time. Of course, this doesn’t give you enough information to determine whether this is the right view to extend. So the other thing you need to check is the type of the entity.
You can do this using the following code:
// Make sure that we target the correct views
if (!isMasterView && !isConnectView && !isNotesView)
{
    return Task.FromResult(entityView);
}

var request = this.Commander.CurrentEntityViewArgument(context.CommerceContext);
// Only proceed if the current entity is a sellable item
if (!(request.Entity is SellableItem))
{
   return Task.FromResult(arg);
}
We check the view name and check whether the request is for a sellable item entity.
If all conditions are met, we create a new child entity view:
 var view = new EntityView
               {
                    Name = notesViewsPolicy.Notes,
                    DisplayName = notesViewsPolicy.Notes,
                    EntityId = entityView.EntityId,
                    ItemId = variationId,
                    EntityVersion = entityView.EntityVersion
                };

  entityView.ChildViews.Add(view);
We create a new child entity view and set it’s properties, like the id of the Entity we are targeting and the version of that entity.
Then we add the newly created view to the childviews of the entity view.
Next we retrieve the NotesComponent from the Sellable item and use this to add the properties we want to display to this new view:
var component = sellableItem.GetComponent<NotesComponent>(variationId);

targetView.Properties.Add(new ViewProperty
{
    Name = nameof(NotesComponent.WarrantyInformation),
    RawValue = component.WarrantyInformation,
    IsReadOnly = !isEditView,
    IsRequired = false
});

targetView.Properties.Add(new ViewProperty
{
    Name = nameof(NotesComponent.InternalNotes),
    RawValue = component.InternalNotes,
    IsReadOnly = !isEditView,
    IsRequired = false
});

return Task.FromResult(entityView);
And don’t forget to add it to the IGetEntityViewPipeline.
services.Sitecore().Pipelines(config =>
    config.ConfigurePipeline<IGetEntityViewPipeline>(c =>
           c.Add<GetNotesViewBlock>().After<GetSellableItemDetailsViewBlock>()
    )
);
Then, restart the commerce engine and see if the new view is visible in the merchandising manager.
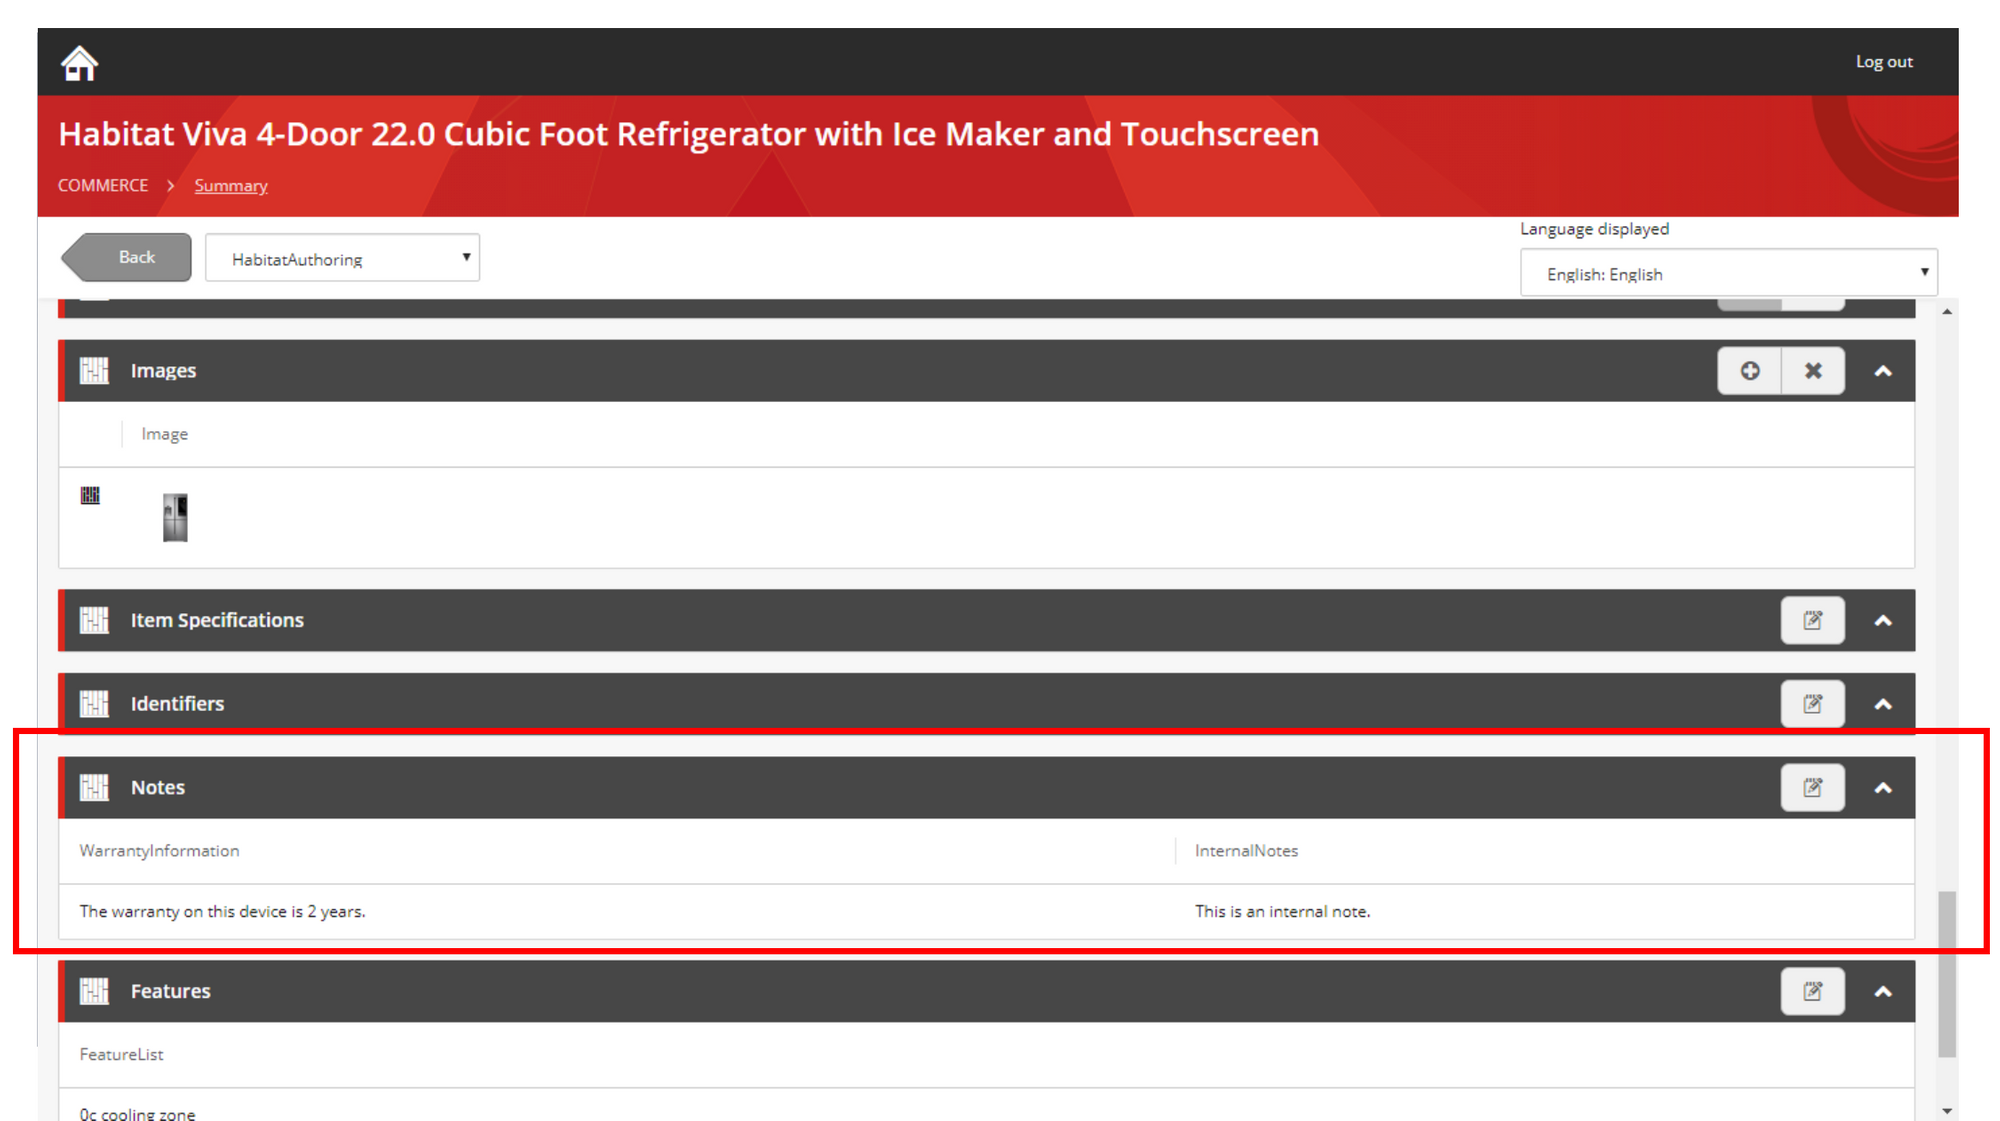
As you can see, the Notes view has been added displaying the notes that were added to the sellable item.
In summary, to add a new view:
- Create a new block
- Find the master view you want to extend
- Add an entity view as a child view
- Add properties to that entity view
- Add block to
IGetEntityViewPipeline
You can find the code for this block here.
Discuss item links:
- EntityLink
- ItemLink
- SubItemLink
See also: http://andrewsutherland.azurewebsites.net/2018/10/02/business-tools-ui-hints-and-ui-types/
How do I create a new navigation item?
What if you want to add a whole new navigation item or dashboard, for instance because you have created your own entity and want some way to view or edit it.
Well, as with almost everything having to do with the business tools, it’s easy: add a block to a pipeline.
In this case you will have to add a block to the IBizFxNavigationPipeline.
Out-of-the-box the IBizFxNavigationPipeline looks like this:
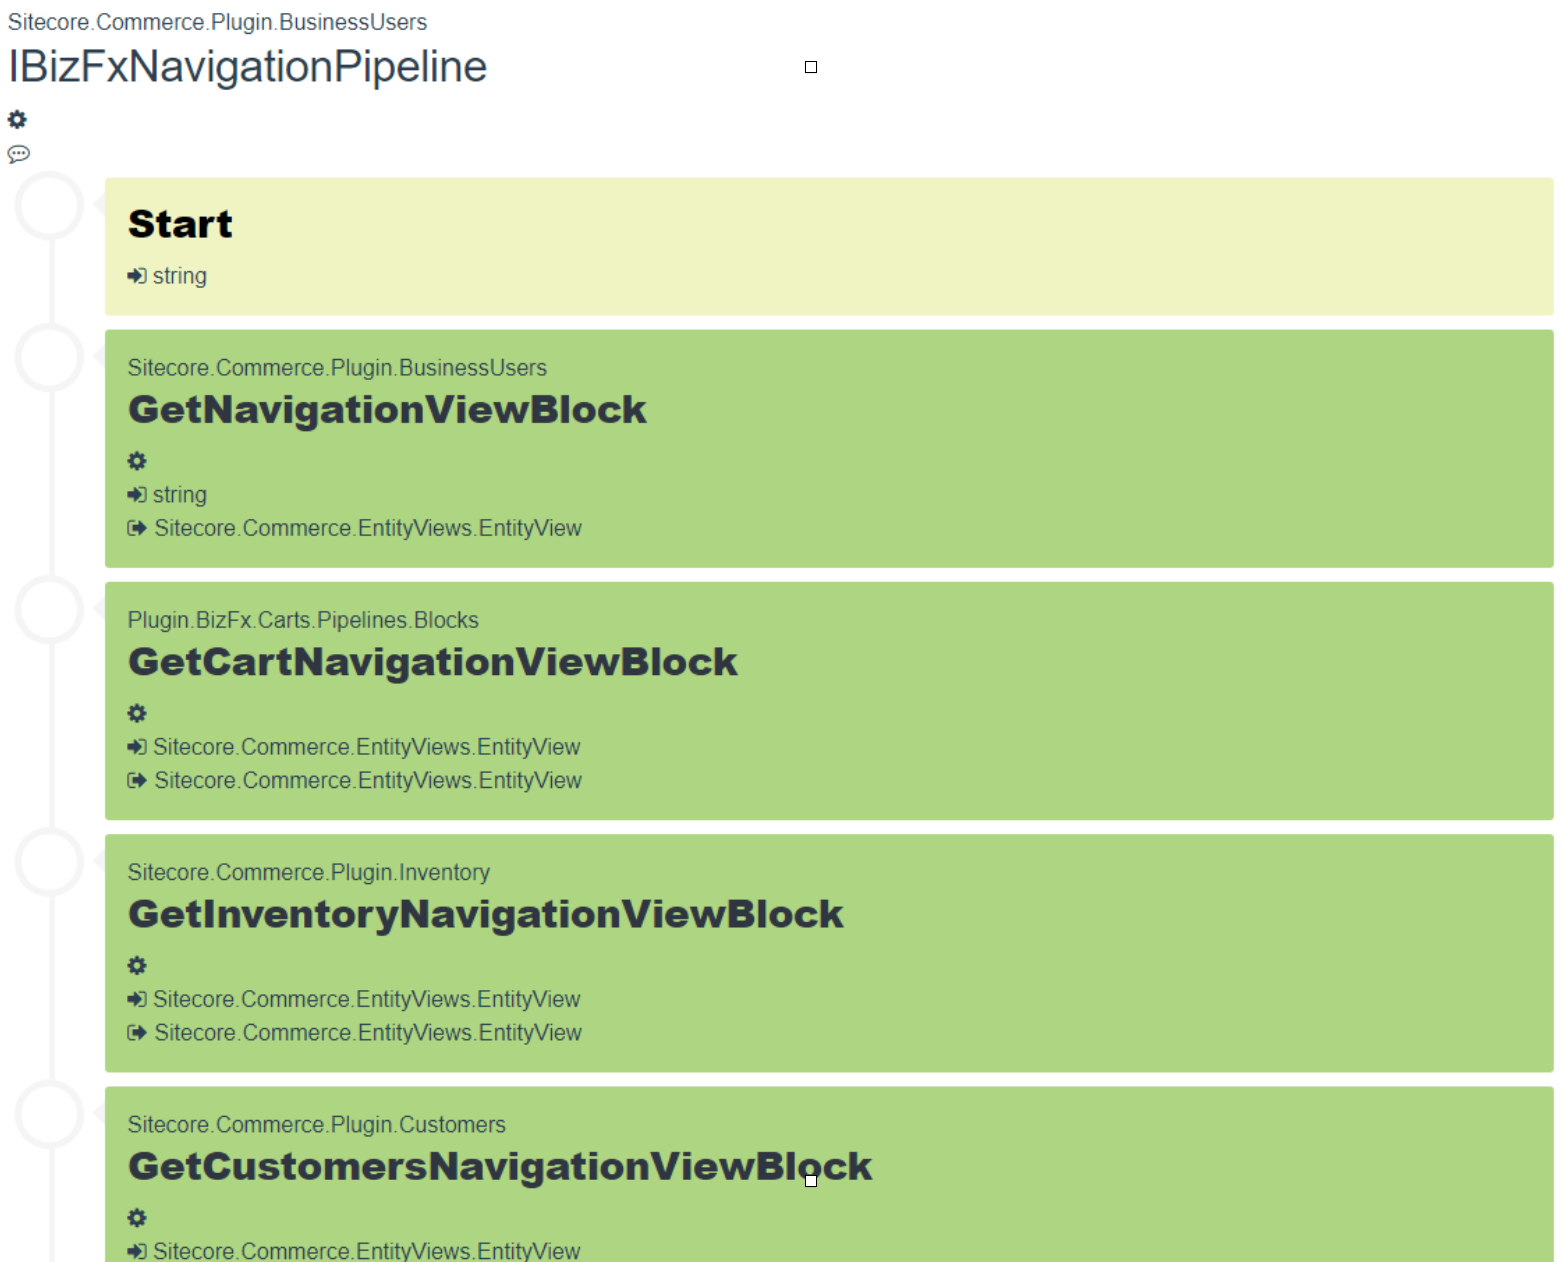
As you can see, it contains one block for each navigation item/dashboard in the business tools. If you want to add a new dashboard, you just add a block.
The code for this block is quite simple:
public class GetCartNavigationViewBlock : PipelineBlock<EntityView, EntityView, CommercePipelineExecutionContext>
{
    protected ViewCommander Commander { get; set; }

    public GetCartNavigationViewBlock(ViewCommander commander)
        : base(null)
    {
        this.Commander = commander;
    }

    public override Task<EntityView> Run(EntityView entityView, CommercePipelineExecutionContext context)
    {
        Condition.Requires(entityView).IsNotNull($"{this.Name}: The argument can not be null");

        EntityView cartsView = new EntityView();

        cartsView.Name = context.GetPolicy<KnownCartViewsPolicy>().CartsDashboard;
        cartsView.ItemId = context.GetPolicy<KnownCartViewsPolicy>().CartsDashboard;
        cartsView.Icon = "luggagecart";
        cartsView.DisplayRank = 2;

        entityView.ChildViews.Add((Model)cartsView);

        return Task.FromResult<EntityView>(entityView);
    }
}
First you create a new entity view.
EntityView cartsView = new EntityView();
Next, you set the properties of the entity view. You can use the Icon property to specify the icon you want displayed and you can use DisplayRank to specify which position you want the new navigation item to be in.
cartsView.Name = context.GetPolicy<KnownCartViewsPolicy>().CartsDashboard;
cartsView.ItemId = context.GetPolicy<KnownCartViewsPolicy>().CartsDashboard;
cartsView.Icon = "luggagecart";
cartsView.DisplayRank = 2;
Finally you add the created view to the entity view:
entityView.ChildViews.Add((Model)cartsView);
The result of the IBizFxNavigationPipeline pipeline is an entity view with a child entity view for each dashboard.
And this is what the result looks like.
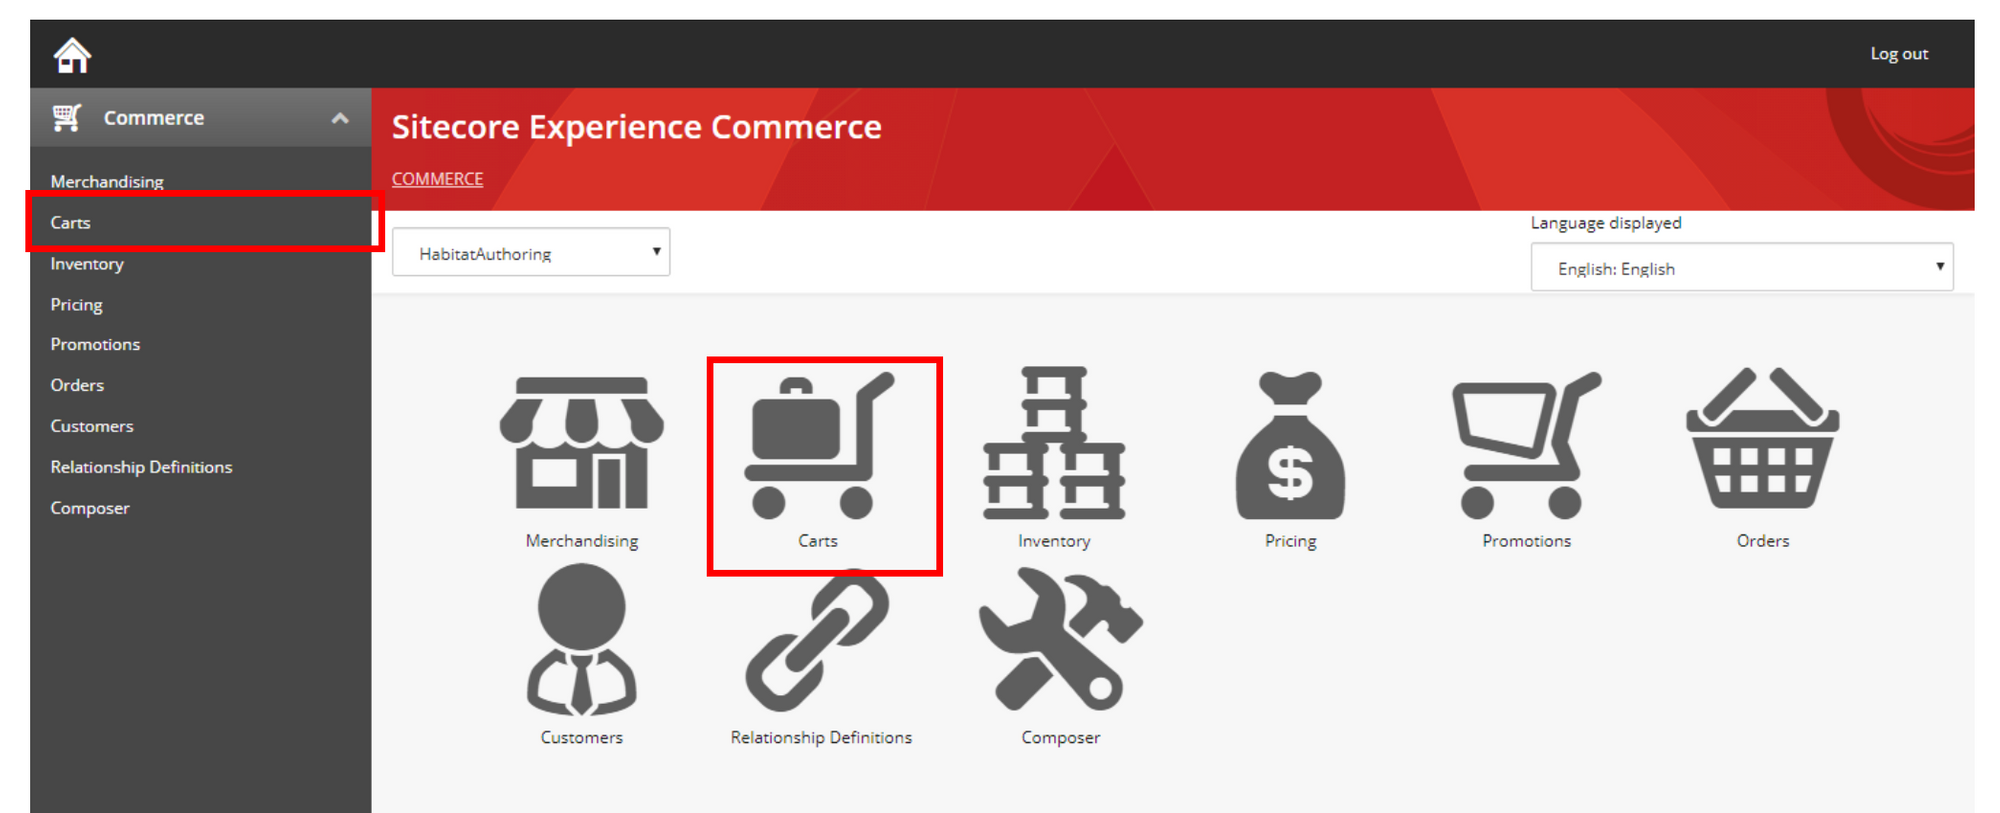
You have a new navigation item called Carts which you can then use to create views to display the carts.
You can set the icon you want to display and set the place you want to display the in.
You might ask: which icons can I use? The icons you can use are in a style sheet in a Speak package: speak/icon-fonts/dist/sitecore-icons.css
In summary, to create a new navigation item:
- Create a new block
- Add a child view to the entity view for the navigation item
- Add the block to the
IBizfxNavigationPipeline
You can find the code for this block here.
How do I add a new action?
Now we know how to view things, but how do we influence that data? How do we edit a component on a sellable item, change the status of an order or create the inventory for an product.
That's where the actions come in.
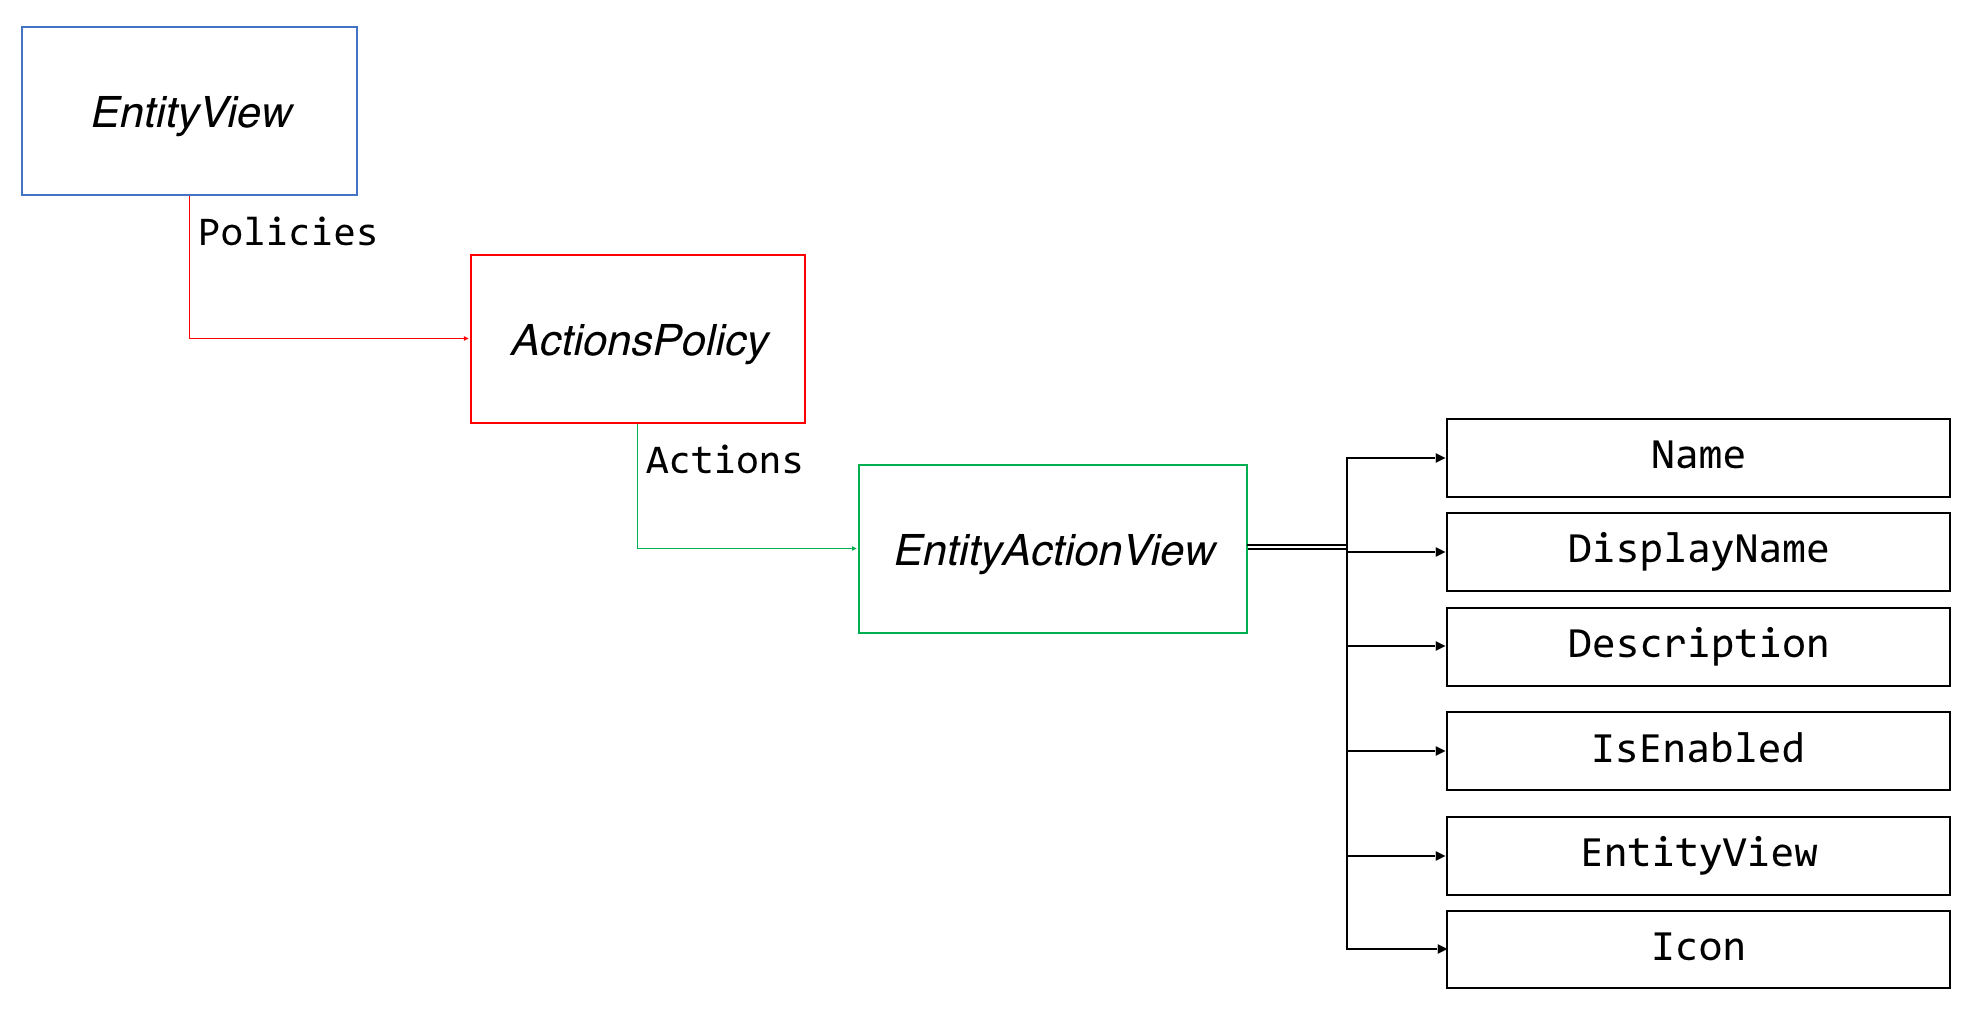
Actions are added to the view as a policy, called ActionsPolicy. An ActionsPolicy contains one or more EntityActionView instances.
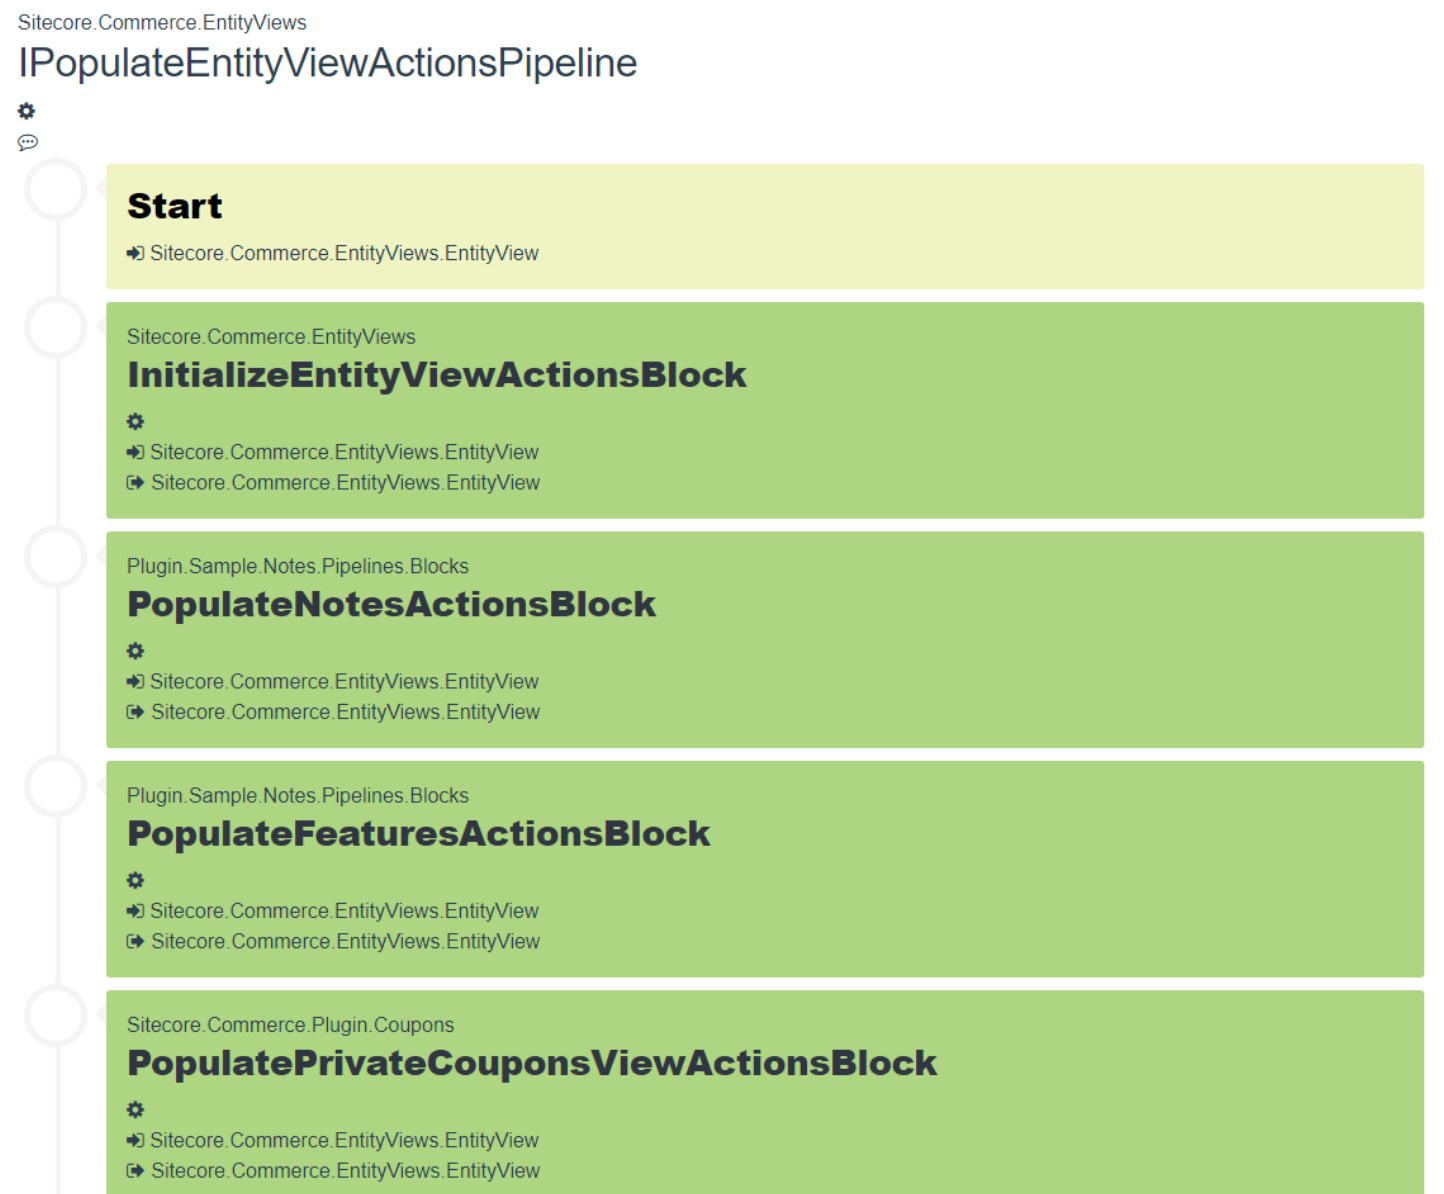
Actions are added to the Entity Views in the IPopulateEntityViewActionsPipeline.
It contains a block for each feature that needs to add actions to an entity view.
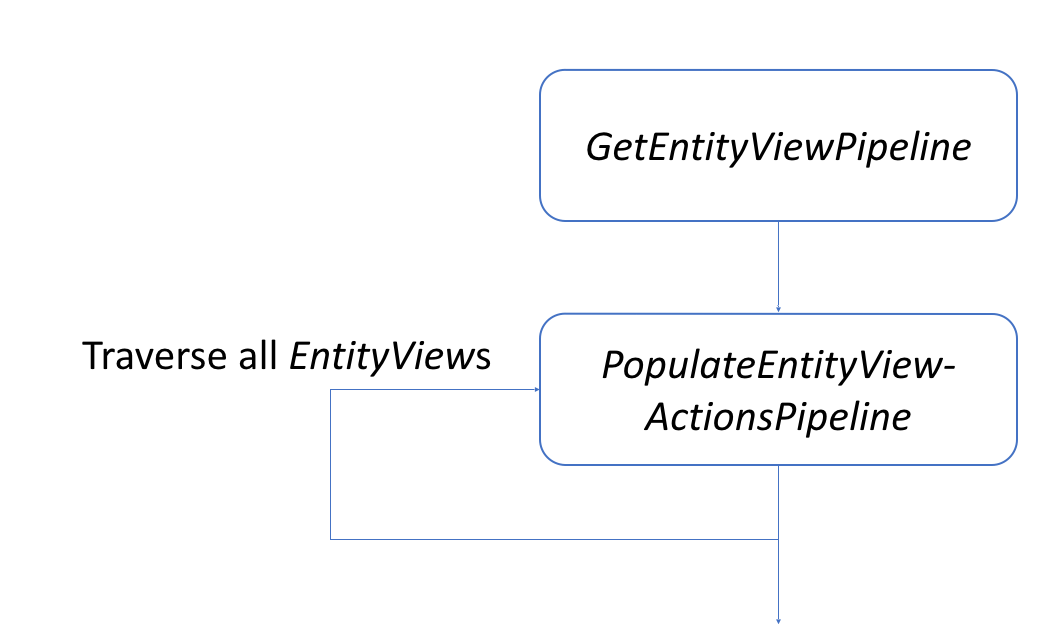
The IPopulateEntityViewActionsPipeline is run after the IGetEntityViewPipeline for each entity view.
To add a new action, you create a new block:
[PipelineDisplayName(nameof(PopulateCartLineItemsActionsBlock))]
public class PopulateCartLineItemsActionsBlock : PipelineBlock<EntityView, 			EntityView, CommercePipelineExecutionContext>
{
   .
   .
   .
}
As with the entity views, you only want to add an action to a specific entity view so you need to check the name of the entity view.
The code looks like this:
public override Task<EntityView> Run(EntityView entityView, CommercePipelineExecutionContext context)
{
    Condition.Requires(entityView).IsNotNull($"{this.Name}: The argument can not be null");

    var viewsPolicy = context.GetPolicy<KnownFeaturesViewsPolicy>();

    if (string.IsNullOrEmpty(entityView?.Name) || !entityView.Name.Equals(viewsPolicy.Features, StringComparison.OrdinalIgnoreCase))
    {
        return Task.FromResult(entityView);
    }

    var actionPolicy = entityView.GetPolicy<ActionsPolicy>();

    actionPolicy.Actions.Add(
      new EntityActionView
      {
          Name = context.GetPolicy<KnownFeaturesActionsPolicy>().EditFeatures,
          DisplayName = "Edit Sellable Item Features",
          Description = "Edits the sellable item Features",
          IsEnabled = true,
          EntityView = entityView.Name,
          Icon = "edit"
      });


    return Task.FromResult(entityView);
}
First you check if the supplied entity view is the one you want to add your actions to. If that is the case you retrieve the ActionsPolicy and add an EntityActionView to it. Remember to always add it and not create a new ActionsPolicy, because there might have been another block that already added an action to the view.
Looking at the properties of an EntityActionView there are some things to note:
- First, there is the
Nameproperty. You will need to act on this name later so it should be unique. - The
DisplayNameandDescriptioncan be localized - Set the
RequiresConfirmationto true if you want to create an action that requires confirmation. In that case you can use theConfirmationMessageproperty andConfirmationTermsproperty to create a meaningful message to the user. EntityViewis the name of an EntityView that you want to display in a modal popup when the action is executed. TheIGetEntityViewPipelineis run to retrieve the properties for this entity view.- If you don’t need confirmation and you don’t want to show a popup, set
EntityViewtonulland setRequiresConfirmationtofalse.
When you run the engine this will be the result.
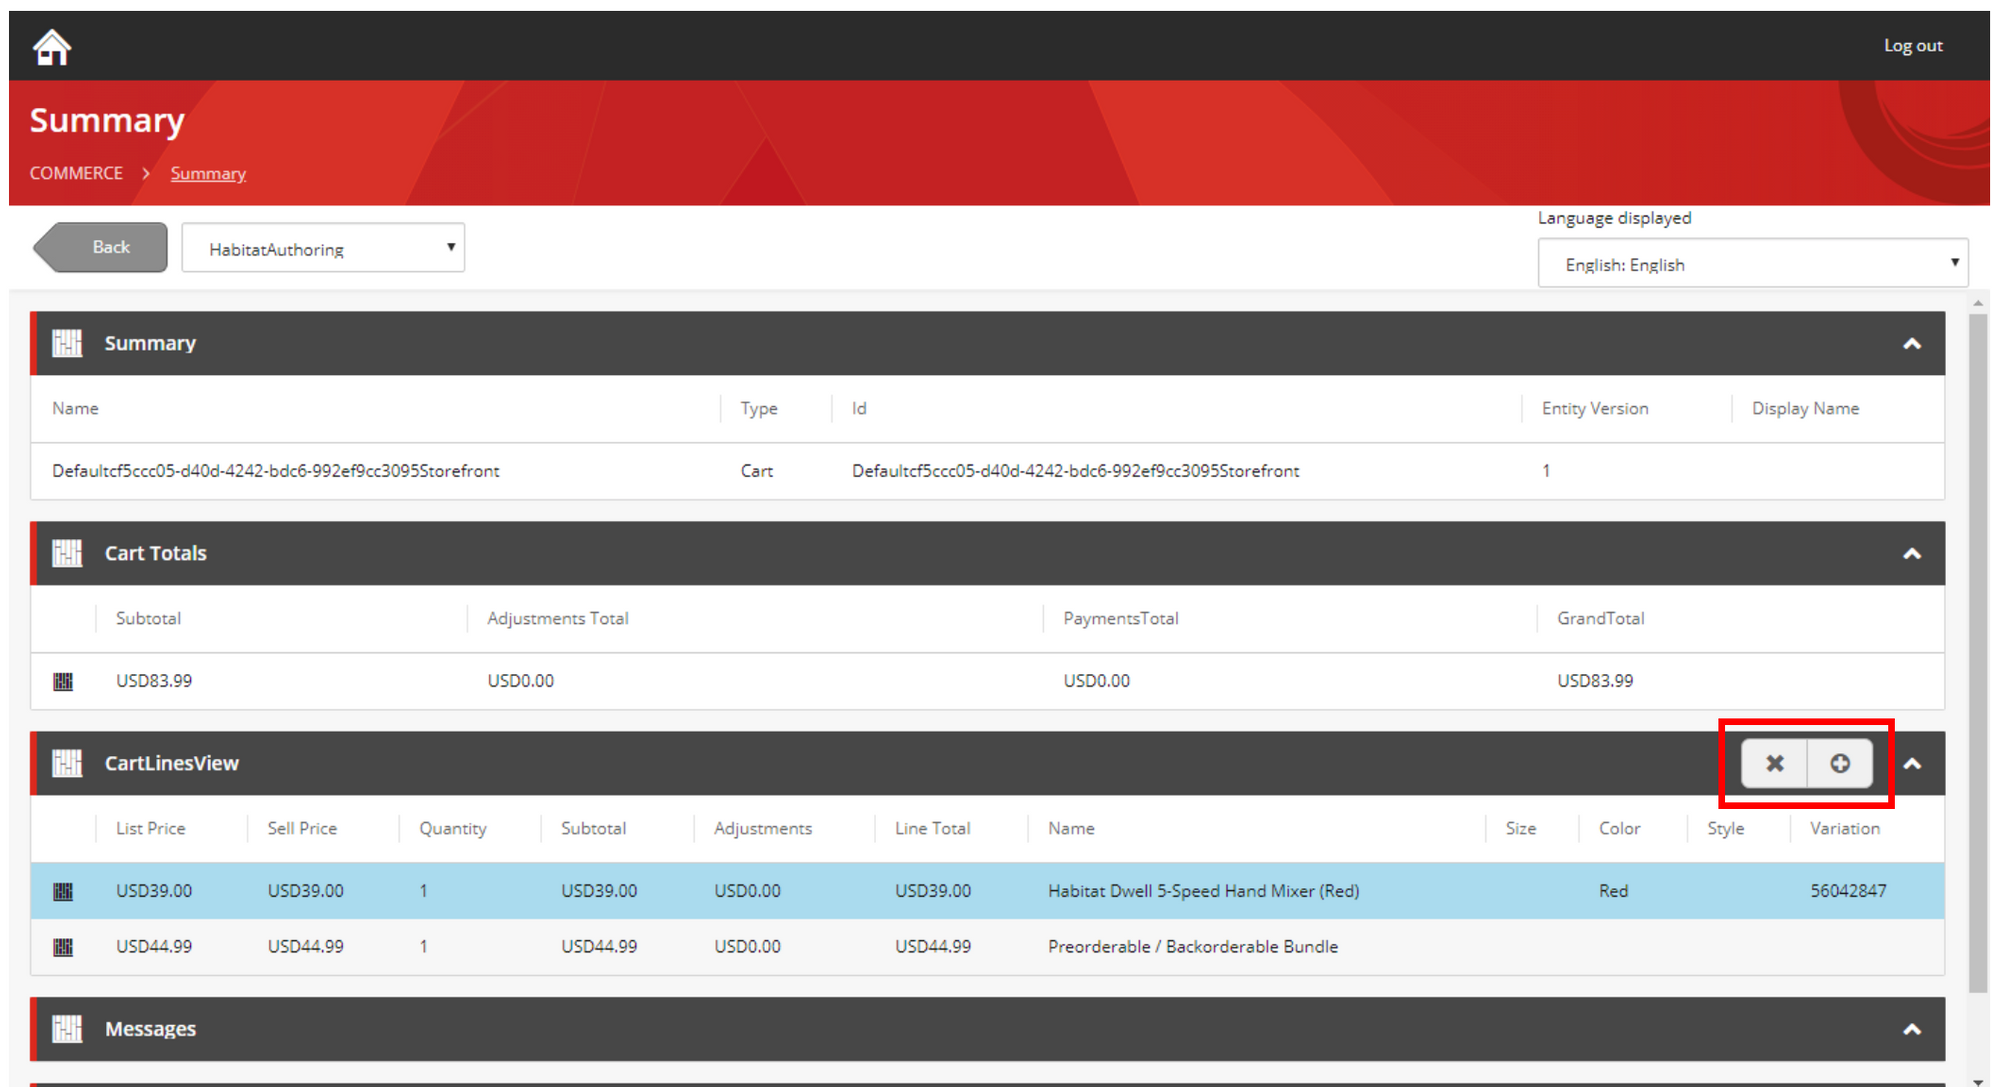
You have two new actions.
Executing an action will always lead to one of the following happening:
- If
EntityViewis empty, an action is performed by running theIDoActionPipeline; - If
RequiresConfirmationis true, a confirmation dialog is shown and if the user clicks OK, theIDoActionPipelineis run; - If EntityView has been set, this entity view is first retrieved using the
IGetEntityViewPipelineand after the user has clicked OK, theIDoActionPipelineis run;
The IDoActionPipeline is where the action is performed, for example, the changed properties of a sellable item are saved or a cart line is deleted.
The input for the IDoActionPipeline is again an EntityView object, containing the data the user entered in the dialog and the Action property set to the name of the action supplied in the EntityActionView.
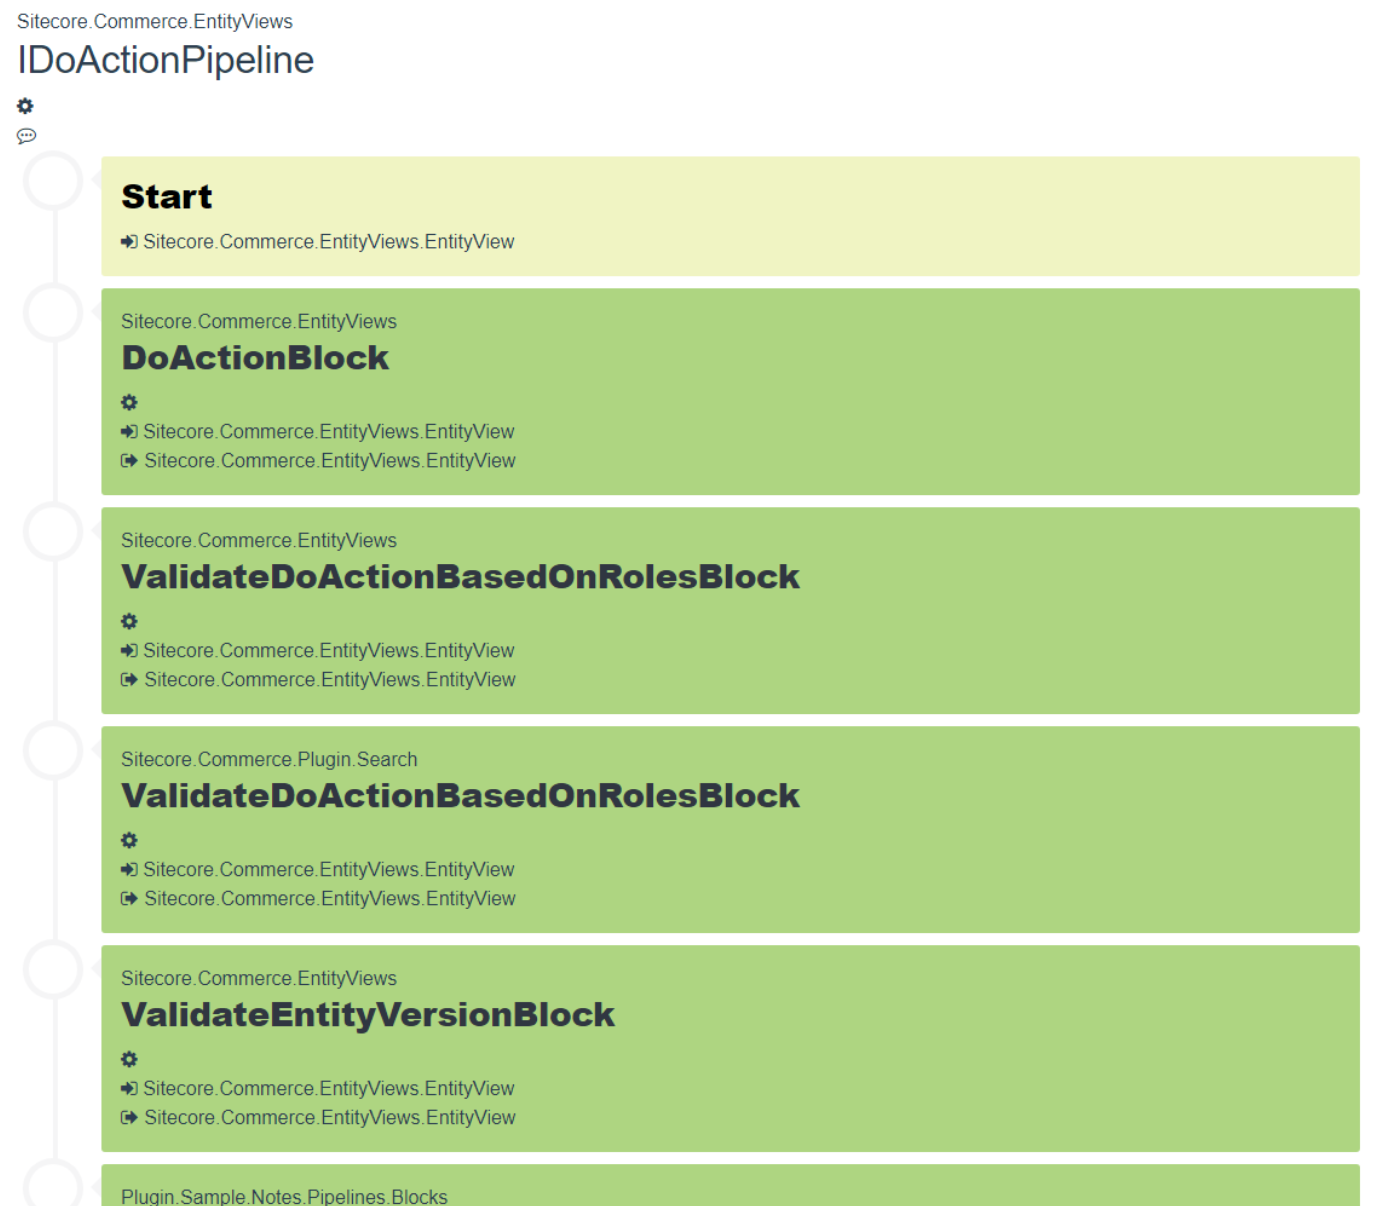
The IDoActionPipeline contains a block for each action that can be performed. Again you have to check whether your block needs to do something based on information in the EntityView object.
Here is an example for a block that deletes the line in a cart:
[PipelineDisplayName(nameof(DoActionDeleteCartLineBlock))]
public class DoActionDeleteCartLineBlock : PipelineBlock<EntityView, EntityView, CommercePipelineExecutionContext>
{
    protected CommerceCommander Commander { get; set; }

    public DoActionDeleteCartLineBlock(CommerceCommander commander)
        : base(null)
    {

        this.Commander = commander;

    }

    public override async Task<EntityView> Run(EntityView entityView, CommercePipelineExecutionContext context)
    {
        Condition.Requires(entityView).IsNotNull($"{this.Name}: The argument can not be null");

        var knownCartActionsPolicy = context.GetPolicy<KnownCartActionsPolicy>();

        if (string.IsNullOrEmpty(entityView?.Action) ||
            !entityView.Action.Equals(knownCartActionsPolicy.DeleteCartLine, StringComparison.OrdinalIgnoreCase))
        {
            return entityView;
        }

        var updatedCart = await Commander.Command<RemoveCartLineCommand>().Process(context.CommerceContext, entityView.EntityId, entityView.ItemId);

        return entityView;
    }
}
The Run method first checks whether it needs to react to this request. It checks for the Action. If it is not the correct action, it just returns the EntityView.
If it can handle the request, it will execute the RemoveCartLineCommand, supplying the id of the entity and the itemid, which in this case is the id of the line to delete.
In summary, to handle an action:
- Add a block to the IPopulateEntityViewActionsPipeline to show the actions
- Add a block to the IDoActionPipeline to handle the selected action
You can find the code for these blocks here.
Create an action that requires confirmation > set requiresconfirmation on Action and don’t set EntityView
If you don’t require confirmation, don’t set an entity view name and set requiresconfirmation to false ?
How does authorization work?
The business tools give users access to potentially sensitive data, which means we want to make sure not everybody can access that data.
You have already seen that you need to log in to get access to the business tools and that Sitecore Identity Server is used to authenticate you. How does that work?
Once you have successfully logged on, Sitecore Identity Server gives a token to the business tools and this token is subsequently used to authenticate with the authoring server. This token not only validates that you are who you say you are, but it also contains your roles.
Management of users is done through the Sitecore XP User manager. This is where you assign commerce roles to users. Out-of-the-box, Sitecore Commerce has the following commerce specific roles:
- Commerce Administrator
- Commerce Business User
- Customer Service Representative
- Customer Service Representative Administrator
- Merchandiser
- Pricer
- Pricer Manager
- Promotioner
- Promotioner Manager
- Relationship Administrator
If you want to access the Business tools, you always need at least the Commerce Business User role. Also note that even the admin user needs to be assigned a Commerce role, otherwise you won’t have access.
So, how is decided what you get access to?
This is actually a two-step process and it’s all configured by policy sets. There are two policy sets that play a role here.
First there is the ControllerMethodRolesPolicySet, which enforces access to the API by checking if the user has the Commerce Business User role.
Secondly, there is the AccessByRolesPolicySet which you will find in Plugin.AccessByRoles.PolicySet-1.0.0.json.
It contains an ActionsRolesPolicy which contains a list of ActionRoleModels
An ActionRoleModel has four string properties:
ViewActionEntityTypeRole
Here is an example of what an ActionRoleModel entry looks like:
If you want to limit the actions somebody can do, you always specify the view for which the actions have been defined. (So Action always requires a View)
The View property supports wildcards.
How is this enforced?
Remember that the last step in the IGetEntityViewPipeline is to run the IFormatEntityViewPipeline? The IFormatEntityViewPipeline also takes care of authorization, removing any view that you do not have access to. There are a couple of blocks that are responsible for this:
DisableEntityActionsBlockValidateViewBasedOnRolesBlockValidateViewActionsBasedOnRolesBlock
If you create new roles, note that you need to add them to the Commerce Administrator role if you want your admin user to still be able to access the parts you are limiting, otherwise he doesn't have access.